Wednesday 25 November 2015

Scrapheap challenge - part nine (Duchess)


Time for an update on loco 3 of 4:


After previously stripping, priming and painting the Castle and Duchess bodies, they were left while I accumulated some cash to fund the transfers. 

For now, I've invested in some more LMS transfers from Fox, along with the brass nameplates. These arrived within 48 hours of ordering and I wasted no time fitting them.

With the transfers fixed in place, Matt lacquer was applied to finish the loco, reduce the shine of the satin black paint and give a little more shine to the grey primer. 


This is the final result, having found the necessary fixings for the bogie and the loco body. The transfers aren't suited to being applied to a flat, primer-based finish and I wrecked the first set of LMS transfers on the tender, on both sides, by applying the lacquer too quickly and in too great a quantity. 

So the tender was stripped and painted again. The transfers were added and left for a day to harden before careful lacquering. After some initial concerns that the graphics were shrivelling again, they retained their shape once everything dried. The instructions supplied do clearly state that they're not suited to matt surfaces so it wasn't a huge surprise that I had issues. 

The final result, whilst not quite identical to the Wrenn version, is certainly good enough to run and exhibit - a far cry from the state it was in when it arrived. At least it now has a future and after a few speed runs around the loft, it's ready for showing. 


Tuesday 24 November 2015

Double heading

A question that's come up a few times of late is how I get my locos to run double-headed, ie what tricks do I use, do I use unpowered dummies etc etc.

First of all, there is no cheating. All locos run under their own power. The only exception to this is the six car EMU whereby the rear three coaches are un-powered. 

Double-heading, when it goes right, looks pretty impressive and can be achieved with reasonable ease if the following measures are observed:

1: Loco condition - nearly all of my locos are fitted with neo magnets and are well serviced. Most run well under 0.5 amps, which is critical for running in pairs. Check the current consumption of each locomotive individually. It may be necessary to run them for a few loops to warm up first. Total current consumption needs to be under 1 amp. This is where having ammeters is very handy.

2: Power - an A3 can just about manage a small rake of coaches and two locos. Power needs to be applied gradually and carefully to avoid tripping the controller and running speed is notably slower. Duette controllers are far less sensitive and can handle the job far better. My Trax feedback controllers, rated at 1.5 amps cope with the job just fine.

3: Track - needs to be spotless, no flat spots. If one of the two locos stalls at any point it will potentially uncouple or derail. More so with locos running rubber tyres - they don't do sudden stop / starts!

4: Loco speeds - rarely will two locos run at exactly the same speed - we're talking about over fifty years of wear & tear! Choose two locos that run at a similar speed. Run them together uncoupled at the speed you intend to run. Different motors and gearing can affect the speed at various power levels so run at the speed you intend to run and put the faster of the two at the front. This keeps the coupling between the locos under tension. If the faster loco is at the back it will potentially derail, especially if there are front and rear bogies involved.

A few gratuitous double-heading pictures below:

The 8Fs are nearly always run in double-headed formation. As manufactured they were not supplied with front couplings but the front bogie is identical to a 2-6-4 so the slower of the two was given the transplant!

When running with the long rake of SR coaches, one 8F can do the job. For the goods wagons, assistance from the second 8F was definitely required.
I cheated a little when I was producing the transfers for these 2-6-4 tanks - I chose the two chassis that ran the best together and numbered them in sequence!

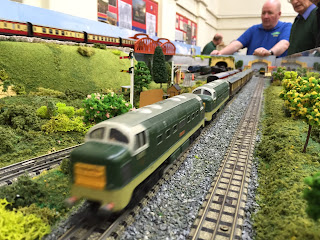
The Deltics are very similar in power and will run in any formation. They do however have to be stopped and started carefully due to the rubber tyres. It's not uncommon for tyres to come off when stopped rapidly from speed!

These two 0-6-2 tanks were produced one after the other and were put together as an experiment to see if they would run together. 2273 was marginally faster than 2274. 2273 is also fitted with a home-spun armature!

As with the Deltics, the Co-Bo's require careful stop / starts - one Co-Bo is currently out of action having shed two tyres!

The Castles were never manufactured with front couplings. After experimenting with chain links, I engineered a solution by reaming the front bogie and installing a coupling from a scrap wagon. Again fitted to the slower loco of the two.

One Castle has the old half inch motor, the other has the newer ringfield. Both perform quite happily together.

For authentic Bo-Bo double-heading, they should run nose-to-nose. Do this with two standard locos and they'll either run off in opposite directions or stall on the track as they push against each other. The polarity in one of these is reversed - this can be done either by swapping the wires on the brushes, or as I've done with one of these, by turning the magnet around!

Another blue EMU!

Previously I said I couldn't stomach the thought of making another blue EMU - so here's another one!

I found myself with two of the three coaches required so decided to start production of another class 501 unit.

Feedback on the other two units during recent shows has been really positive, with most people understanding that it's a better alternative than scrapping. However one recent comment started me off on a little investigation - what about headcodes and destination blinds?

After lots of research, I found a good selection of pictures of the class 501, of which the SR EMU is based.

Now the Dublo version is a bit of a mongrel - it's based on a class 501 but has carriage numbers from an EPB unit, even though the class 501 has shorter carriages. having found the correct carriage numbers previously, this one will form unit 501135 (the previous ones being 133 and 134)


For the headcode, I struggled to find a suitable font. On SR EMUs, Gill Sans looks reasonable but on the 501 the font is different. In the end I had to take a screenprint and then crop the image:


After lots more cropping, colour, brightness and contrast corrections, I had the graphics I needed and printed them ready to stick onto the plastic window:


The result looked ok but not great - printing black onto matt paper produces a charcoal effect, so after more tweaks I used gloss vinyl and printed the lot in one go, producing a black overlay to stick over the clear cab glass:


Looks reasonable and I'll probably apply the same graphics to the other two units. I have several destinations and headcodes B1, B2 and B4 for added authenticity.

Sunday 15 November 2015

Millbrook model railway show

A chance conversation during a visit to a model railway shop to buy wagons (when I was doing the "Paint your wagons" series) led to an exchange of emails, and then another offer to exhibit!

Southampton, Millbrook to be exact, is the furthest we've travelled so far. With the extra distance in mind, we opted for a Saturday morning arrival and setup. Now I'm by no means a fan of early morning setups, the track is old and can give problems but thankfully went together in no time and ran without fault...

...until about lunchtime on the first day!

A dead short appeared along the front of the layout. Probably the only downside of removing all those points is that I've now lost the opportunity to isolate sections of the layout, which made fault diagnosis much simpler. In the end, the only way to narrow down where the fault was, was to actually separate the boards - not easy to do once fully setup with the curtains in place, and certainly not easy when the exhibition is open!

After establishing which board was faulty, it was then easier to locate. The ammeters, while they look really fancy and ott, really prove their worth in a situation like this and makes fault tracing far easier. If you're considering building any layout, factor in some ammeters - it will save you time and may save you a few burnt out locos, even controllers!

Anyway, after checking the track, a warm spot was noted, the track had become notably hot in one section and this was the location of the short. Sadly I hadn't packed any track on the first day, so after establishing that the centre rail was resting on the tinplate at the joint, it was quickly bent back into shape with pliers and swiftly replaced the following day.

That wasn't to be the end of the track problems - a dead spot then appeared on the outer loop just after the station platform (yep, in the tunnel!) so a quick soldering job was required to sort this one out.

It's fair to say that doing three, weekend-long shows in such a short space of time had raised concerns, firstly how many locos would come home knackered after so much use and secondly, would I get fed up with running the layout? - Thankfully having completed the three shows, the casualty list has only one entry. It would have been more but several were repaired swiftly during the weekend but City of Birmingham is the casualty this time, having slowed to a stop and showing no signs of life and no power consumption.

My recent "Scrapheap challenge" 0-6-2 tank was showing some signs of fatigue during the last outing two weeks ago and this weekend, it refused to run, tripping the controller and showing a dead-short. Fearing that my home-spun armature had failed, I removed the body to find that the exposed wire around the interference suppressor had been touching the body. A quick bend into place and off it went again - phew!

Duchess of Atholl also made a return this weekend - I hadn't had a chance to repair it so during a quiet period on Saturday I took a closer look and found that only one connecting pin had come out. This was re-secured and although the ex-Duchess of Rutland chassis sways a fair bit, it ran reasonable well, albeit at a more gentle pace than normal!

The recently converted Wrenn 8F proved to be a disappointment, being barely able to haul more than itself and flatly refusing to double-head with the other 8Fs. I suspect the issue is either the plastic tender wheels and / or too much spring tension in the plunger pickups. I'll experiment with the tender from 48158 - the loco in need of cosmetic attention, I haven't given up yet.

I also finally got all eight of the fiddle yard sidings to operate properly, running in and out of both inner and outer sidings all weekend, where previously only some of the inner ones worked. I also managed to carry out a loco exchange from the turntable into the inner fiddle yard - the first time that this move as successfully been completed.

As we were a little further afield, we attracted visitors who hadn't seen us before. Again we've had plenty of great feedback and at least four offers to exhibit elsewhere during 2016 and 2017. We're certainly going to be busy next year, and the year after!

4 o'clock came around very quickly on Sunday and then it was all over and time to go home.

Nice to get the layout fully working at last - all the recent modifications and tweaks have really paid off and the reliability gets better and better. The track short issue is a concern and I may have to rethink the 37pin "breakout" connectors between the boards. Although it makes setup quick and easy, it's not easy to disconnect in a fault situation. Either I need to revert to cabled connections or install some additional switches in the boards.

Our thanks to Ron Lines and the Solent Model Railway Group for their hospitality and some mighty fine cakes!

Some limited pictures to follow, once they've uploaded!


Wednesday 11 November 2015

Another 8F

I wasn't really looking for anymore locomotives (unless a cheap City of Liverpool, Ludlow Castle or GWR N2 Tank should appear) but this boxed Wrenn 8F attracted my attention, and at a fairly reasonable price.


Still in its original box and with its packing rings, this one's in excellent condition, albeit rather slow (it wouldn't pass the finger test) so a neo magnet was installed during the usual strip-down, clean up & lube.

Although clearly a Wrenn, it's of course a Dublo design and without doubt, the 8Fs and Castles are by far the easiest locos to convert to three rail operation as the third rail power collection is done via plungers in the tender, the holes for which are present even on the Wrenn versions. The two rail pickup system is left in-situ and is simply grounded to the chassis to give current return to all of the wheels and the magnet is rotated 180 degrees so that the loco runs in the correct direction. All of this also means that it could be returned to two rail running at a later date with ease, of course that won't happen during my ownership.

This one will make its debut this weekend during our next outing at Southampton, I may then withdraw one of the other 8Fs for restoration as one of them is in need of cosmetic improvement.

A nice, tidy & relatively cheap addition to the fleet!

Sunday 1 November 2015

Weymouth MRA - All done!

Just two weeks since the last exhibition and we found ourselves back in familiar surroundings - our home club exhibition.

The layout made its first appearance here twelve months ago today. Since then it's undergone several modifications to improve reliability and more stock has appeared!

After a rather rushed Saturday morning setup, we omitted to test the turntable sidings, which we really should have done as this was the only part of the layout that gave problems and was only discovered a few minutes after the doors opened and we found ourselves with a rather large crowd of people along the entire front of the layout. Thankfully after things quietened down, I was able to locate the source of the problem, which was caused by the same section of track as before. It may be necessary to replace this section if it gives further problems but after the initial tweaks, the layout settled down well.

Faults in the track around the turntable and run-around are particularly difficult to trace due to the fact that this section is controlled by a walkabout controller and has no ammeter, therefore faults are not so easy to spot, or remedy. I may need to investigate the feasibility of adding another ammeter!

Several of the inner sidings of the fiddle yard have been difficult to operate and by the end of the weekend I'd successfully repaired two of them, leaving just the innermost siding needing attention as it fails to isolate properly. The source of the problem has been located and a repair will be attempted on the next exhibition. For now though it works fine as a carriage siding!

For this weekend I ran the newly-modified green EMU in two car formation on the shuttle. This worked reasonably well until early on Sunday when the ammeter needle began approaching 1 Amp. Not good. Thankfully and after a quick strip-down, the problem was being caused by carbon build-up between the commutator segments of the armature. A quick clean with a knife and clean up of the commutator itself and the EMU then returned to faultless operation, looking quite at home on the shuttle track.

Also for the first time ever this weekend, I swapped trains around on the shuttle, utilising the shuttle siding for the first time. This meant not having the breakdown crane on display and for this weekend it remained in its box. A simple change-around system, involving sending one train up to the main station, switching off the shuttle control and then shunting to and from the shuttle siding turned this into quite an easy operation.

I've also gained another Bristol Castle for restoration, a gift from one of the attendees today who saw us advertised and thought I could make use of it. Cursory inspection shows a wire off, missing brush spring and the motor isn't engaging with the gear worm. It'll also need respraying but the paint I already have for the other Castle, which I obtained as part of a job-lot of scrappers (see the Scrapheap challenge posts)

All too soon it was all done & dusted. After overcoming the initial gremlins the layout performed the best it ever has - the recent modification work was definitely worthwhile!

Just two more weeks and we're out yet again, next stop Southampton...

Some pictures (no video this time!) from the weekend:

I produced two more bespoke wagons featuring the WMRA club logo.

Syward Junction looking busy!

The blue EMU received much praise, even from HRCA members!


The green EMU, reduced to two-car operation, running nicely with its rotated chassis.

Both EMUs waiting at Syward Junction

And again!


All four A4 locos saw extended service, along with Duchess of Montrose, covering the absence of Duchess of Atholl, which still awaits repairs.

Managed to park the Blue EMU parallel with the green one for this shot!


Waiting at Brough for the EMU to arrive!


Twin home-made refurbs double-heading on the upper loop on Saturday. For Sunday we replaced these with 80104 & 80105

Sir Nigel Gresley and Golden Fleece. Golden Fleece had suffered issues with derailing over points, the problem was found to be that the pickup assembly was twisted!

Sir Nigel Gresley & Gresley teak coaches, Golden Fleece on the mail train.

The Blue EMU, my current favourite item of rolling stock (you may have noticed!!!)