At the start of 2014, I was busy repairing storm damage to the old layout in readiness for another private weekend run for friends & family only. From there I received an invite to exhibit the old layout, which although had been smartened up for exhibition purposes, wasn't in the best of health and then we hit upon the idea of making a layout for exhibition purposes. The rest of 2014 was a year spent planning, building (spending lots of money) and then ultimately exhibiting the new layout for the first time. The first exhibition back in 2014 led to another offer to exhibit, from that exhibition came another, then another, then another. Before we knew it, we had ten bookings. 2015 has been a pretty full-on year of exhibitions, culminating in winning best in show!
Even though we've been busy exhibiting this year, we've also been hard at work redesigning the various bits that didn't quite work as expected, making subtle changes that have improved reliability. And then there's the more showy stuff like the automated signals, planned but never originally installed. We can now get the layout together and have stock running in under an hour - fully stocked in under two. On the old layout it could take in excess of three hours just to get the thing together and clear the track faults.
And of course let's not forget the rolling stock. In early 2014 I painted my first loco, the 0-6-2 tank, using sticky transfers I sourced from Ebay. I wrote at the time that I wasn't anywhere near trying to restore a Duchess or an A4 - this year I've done both having resprayed two Duchess locos and my Sir Nigel Gresley, along with several other repaints.
There's been plenty of experimentation this year - the scrap wagon graphics first of all and then the more ambitious blue EMU project, which started as an experimental three car set and has since spawned two more three car sets. Sadly the PC crashing means that the original graphics files for these are now gone but they could be recreated using the later blue & grey graphics, which although still in need of some final tweaking, look amazing and a far-cry from how they looked when they first arrived.
My painting skills are improving, they're not perfect and I still make my share of mistakes as I gain more experience with prepping, masking, painting and lacquering. Using waterslide transfers, meth-fix transfers and of course my own home made vinyls to ensure that I have a varied selection of original and neverwas locos to run.
Then there's this blog - it started as a personal diary for me to reflect upon over the many years that I intended to spend up in the loft creating my layout. Now it's a place where I direct people who come to see us and want more information. This little blog now attracts over 1000 hits every month (they can't all be me!)
As I reflect upon the achievements of 2015, it's been a lot of hard work and a lot of fun. After worrying that purists would not appreciate some of the things I've done, both with the layout and the stock, it's clear that I needn't have worried. We continue to be very well received and the diary is already up to nine bookings for 2016 - I probably won't take many more!
So as 2015 comes to an end, it seems only right and proper to say thanks to all the various clubs that booked us to attend in 2015 and 2016 (and even 2017!) thanks to all those who came to see us and said nice things about the layout. Thanks to all those who view and comment on the Youtube videos and thanks to all those who take the time to visit this site and read my various ramblings.
Expect more of the same next year...

Monday, 28 December 2015
When things don't always go as planned...
As we're nearing the end of the year I thought I'd share a few of the things that haven't quite gone as hoped. Many of these were never caught on camera, including getting impatient while waiting for the glue to dry on an EMU roof, using a hairdryer to speed up the process (the rest you can probably work out) and testing the layout in sections, forgetting which direction is which and sending a locomotive flying off the end of a board. These are but a few of the many things that haven't quite gone to plan over the course of the last couple of years and here are a few more examples:
Designing.
Probably the biggest and most fundamental cock-up is the size of the layout we built - intended to stack in the back of a VW Touran (as the old one had stacked perfectly in a BMW 3 series saloon) the first frame fitted but of course I never allowed for the aerodynamic design of the car, which gets shorter and narrower as you stack upwards. Alternative transportation arrangements had to be made.


I still haven't rectified my R yet, as the loco runs on the inner loop it's harder to spot!
And finally, as requested, a little about loft safety.
I still have a test track in the loft and carry out some of my repairs up there. One fateful morning in November during construction of one of the EMUs, I ventured into the loft to spray a coat of lacquer. As I went to leave, my phone rang and I was distracted enough to forget where the top rung of the ladder was, putting my foot into thin air. Thankfully when I fell out of the roof, I fell into the ladder and grabbed it to break my fall. If I hadn't have done so then the consequences don't really bear thinking about.
The bruised arm was impressive though, I've never seen so many different colours over the days that followed...

Designing.
Probably the biggest and most fundamental cock-up is the size of the layout we built - intended to stack in the back of a VW Touran (as the old one had stacked perfectly in a BMW 3 series saloon) the first frame fitted but of course I never allowed for the aerodynamic design of the car, which gets shorter and narrower as you stack upwards. Alternative transportation arrangements had to be made.

The first frame fitted fine of course.
Storage.
Always make sure that you have adequate storage that can handle heavy loading. The layout was initially stacked on top of some old kitchen units at the back of the garage. We even observed the top of one of these sagging but thought nothing of it until I went to extract the car one fateful Saturday afternoon...

It's hard enough to lift these boards on your own, even worse when there's a car in the way. Several sections were lifted clear and then I had to prop up the boards to stop them falling further and causing more damage, both to the car and the boards.
In the end, the car had to have a new bonnet, repairs to both wings and the bumper and then a front end respray. While most cabriolet owners enjoyed the summer of 2014 with their roofs down, mine spent the summer locked away awaiting repairs.
The layout suffered a bent signal and a couple of crushed pieces of track - clearly one was built better than the other.
Transfers.
This year I've been getting to grips with painting and transfers, buying them from several different sources and making my own. I wanted to update my Sir Nigel Gresley and after an experimental respray of a spare A4 body I deemed it good enough to use as a base and acquired some Wren Meth-fix transfers. They went on reasonably easily and the transfer outer protective paper went on straight and true. Everything looked perfect until I pulled away the protective paper on the tender...

And finally, as requested, a little about loft safety.
I still have a test track in the loft and carry out some of my repairs up there. One fateful morning in November during construction of one of the EMUs, I ventured into the loft to spray a coat of lacquer. As I went to leave, my phone rang and I was distracted enough to forget where the top rung of the ladder was, putting my foot into thin air. Thankfully when I fell out of the roof, I fell into the ladder and grabbed it to break my fall. If I hadn't have done so then the consequences don't really bear thinking about.
The bruised arm was impressive though, I've never seen so many different colours over the days that followed...

I also got a severe telling off for going into the roof when there was no one in the house.
If you're going to use a loft ladder, first of all be careful, secondly they work far more effectively if you put your feet on the actual rungs of the ladder. Gravity is such a b*tch,
Saturday, 26 December 2015
Blue & Grey EMU - part four
Time to finish work on the rear coach and complete the set.
The cab front arrived shortly before Christmas, it's clearly not an original but it will do for now.

I abandoned attempts to repair one of the roofs that came with the three bodies and concentrated on another with a chunk missing from the front, again using epoxy repair putty.

After leaving it to set I sanded it down to a reasonable profile and then resprayed. The cab front was also painted. On the first attempt some kind of reaction occurred and the paint bubbled so it was stripped and primed again. Even now it's not perfect but will do for now and as it's the rear-facing end it won't be so visible - especially if I manage to make another three car set to tow behind these!
As a precaution however I haven't glued the roof into position so that if I ever manage to source a better cab front and / or roof, they can be swapped quite easily.
And that's the cosmetic work done - a far cry from how these looked when the first arrived:

Two broken couplings replaced and then ready for a test drive around the loft:


Sadly there isn't much strength in the magnet so some mechanical work will be needed. You can't fit neo magnets to the EMUs without carrying out further modifications, so I'll either be looking for a better magnet or someone with a magnetiser, or of course I could treat myself to one...
Sunday, 20 December 2015
Blue & Grey EMU - part three
Managed to source a centre car. It arrived in reasonable condition and in a box, probably a bit too nice for this kind of treatment but on further inspection, it was showing signs of rust, so after dealing with the rusty bits, time to apply more vinyls:

After applying the other side, the coach was then lacquered - three coats to get the level of shine I wanted.

After fitting the roof, I discovered that there was a mis-match in roof colours. Not sure why as they were all sprayed with the same paint but one had dried notably darker than the other. I then discovered that I'd fitted the wrong roof to the motor car - it had no screw fixing to secure it. So this had to be removed and refitted. I then cracked the other roof as I was removing it. So when the cab front (which I eventually won on Ebay!) arrives I'll have to repair the roof first before I can finally complete this three car set.
Even the roof I've fitted below isn't that great, there's a roof vent missing so I haven't glued this one into position in the hope that a better roof comes along, and if it does then it'll be reasonably easy to swap:

The intention is to have this set ready to run by February. So far it's looking reasonably likely, with only one coach left to finish.
Tuesday, 15 December 2015
Blue & Grey EMU - part two
With the cab front repaired and painted, time to start re-assembly.

Vinyls applied to two of the three bodies, the third one hasn't been started yet as it's not needed for this three car set. I need to source another cab front as the other one has suffered heat damage and is melted beyond repair.

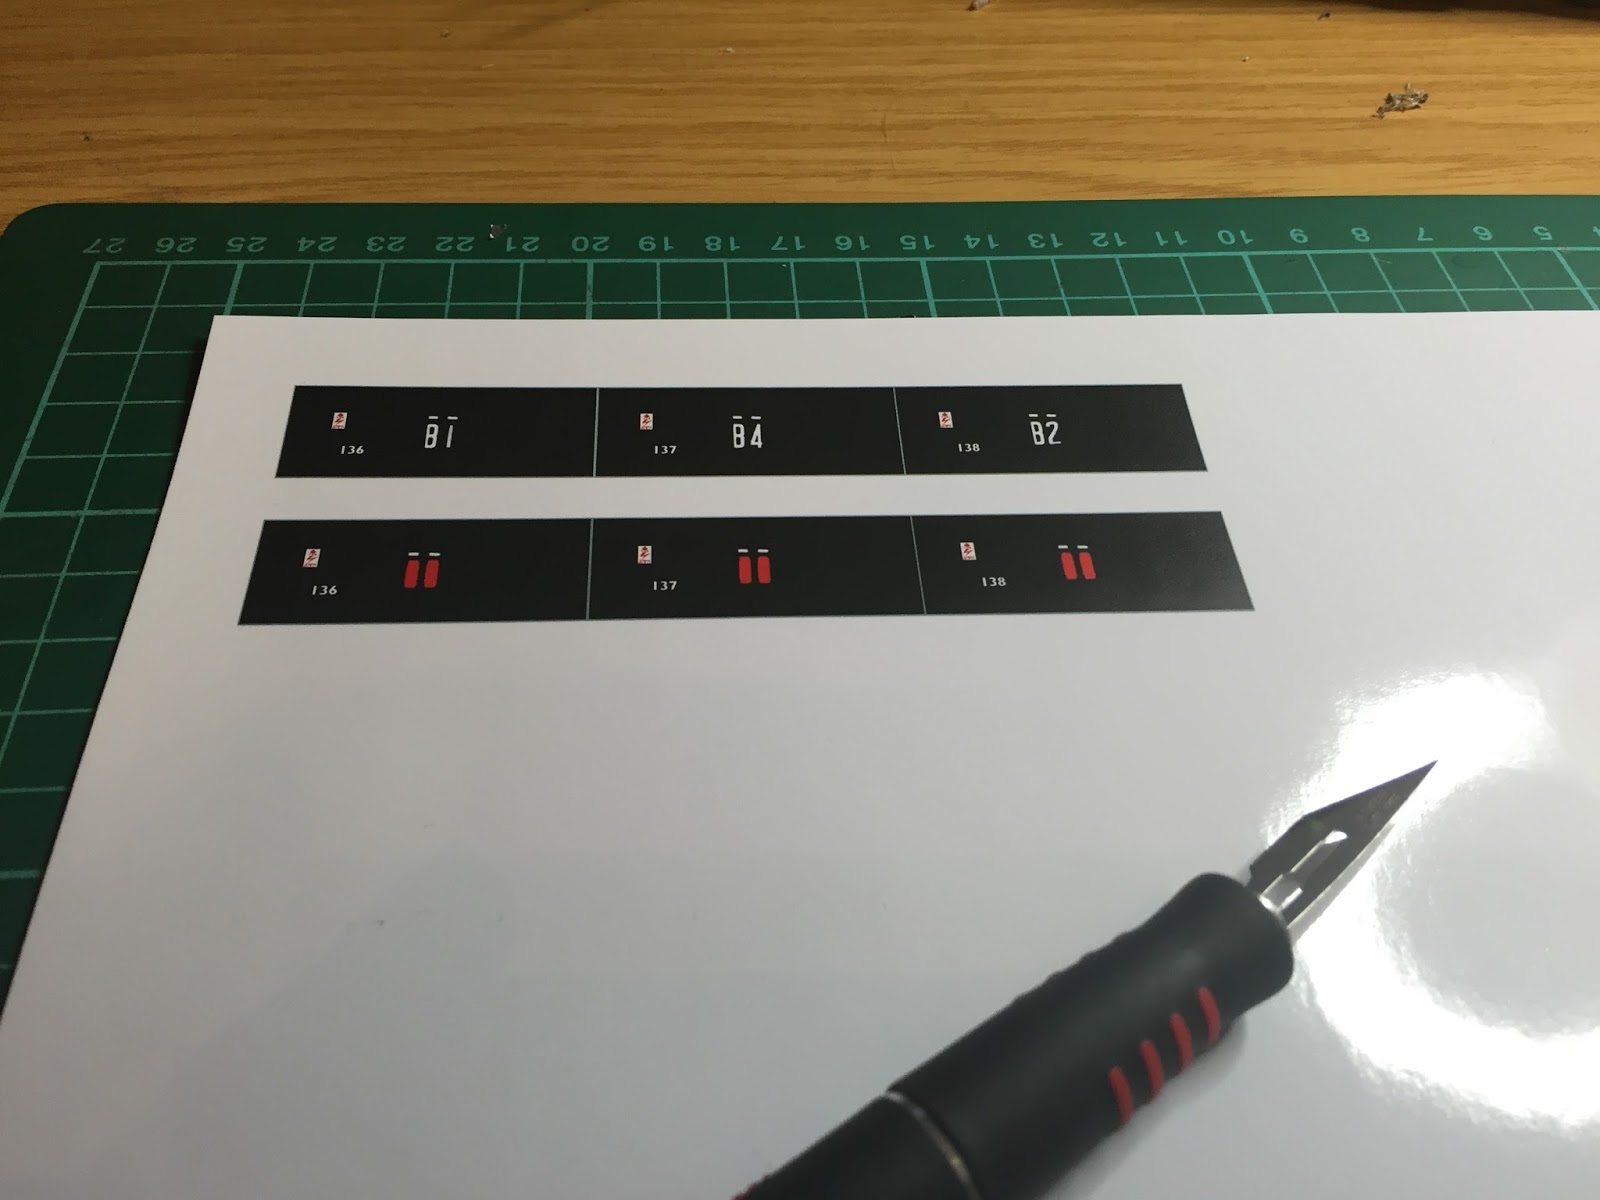
Although I'd previously printed destination blinds and headcodes, I hadn't envisaged needing the extra unit numbers, so numbers for sets 136, 137 & 138 have now been produced.
Final assembly before testing.

And a closer view with the unit number & headcode, destination to be added later.

Wednesday, 9 December 2015
Blue & Grey EMU - part one
One of the most ambitious projects I've ever taken on. Firstly due to the design of the graphics - the extra grey & white portions of the BR livery will look pretty bad if they're not perfectly lined-up. The second issue is the state these bodies are in.
I touched on this briefly during the final Blue EMU update. Here's the first coach to receive attention, along with two knackered cab front ends:

The pictures don't really do justice to the state of the bodies, they're by far the most rusty bodies I've ever seen!
First job was to remove the loose rust and rub down:

Then the whole body had to be primed:

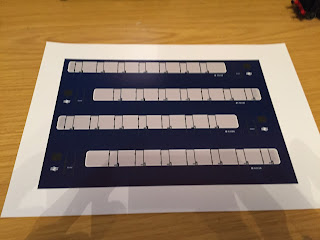
As mentioned before, the basis of the BR blue/grey livery is made using two rounded rectangles in MS Publisher, adjusted to the right size, with the coach graphics layered over the top:

After printing, the vinyl is cut to size, carefully lowered onto the body, checked for alignment and then the windows are cut:

The gloss vinyl (as expected) is way more delicate than the matt version. The ink doesn't tend to fully dry so the vinyl has to be carefully handled. Also it seems much harder to cut, the scalpel blade went blunt after barely finishing the first side.
A long and tedious process, after cutting in all the windows on the first side of coach number one, I fitted the cab front into position to see what it would look like:

A long, long way to go yet, and then I realised that the graphic was skew, so the whole thing was ripped off and new vinyls printed. While I waited for these to dry, I noticed the state of the coach windows:

A quick scrub with bathroom cleaner and it looks a little more presentable:

Time to concentrate on body number two:

This one was even worse and ended up stripped to bare metal!

The coach glass is also far worse:

So after cleaning up the windows and while I was waiting for the primer to dry on the body, I started looking at the one cab front end that I think I can fix:

I've repaired a chip before, but this is quite a large chunk of missing plastic. I've used epoxy putty to fill the gap, applying some to the damaged roof also:

Not exactly pretty but this stuff can be rubbed down once it's hardened:

Barely a few hours after filling, I was able to sand ready for primer:

Set aside to dry after priming, the damage is barely visible now!

The damaged roof and cab front, with the second body - looks a bit different now!

Nose-to-nose - Body one, now with its perfectly aligned graphics now needs its lacquer coat, while body two needs its graphics applied:

This is proving to be quite difficult. I still need to source another cab front end and a centre coach as the three bodies are all outer driving coaches. Hopefully I can get the first coach finished by the end of the week, the rest will probably have to wait until I can find the parts, and at a reasonable cost. Eventually the third body will also hopefully be restored, in the hope that I can create two, three car class 501s in BR blue/grey. This will involve acquiring even more coaches, so for now the aim is to get the first three car set finished.
More to follow...
I hate computers
I've used computers for years, both at home and at work, starting with Windows 3.11 and working with most of the generations of Windows before finally taking up Bill Gates's very generous offer to upgrade to Windows 10 for free.
That doesn't mean I'm a computer expert, or a fan. I well remember the pain of trying to install Windows XP back in the day and accidentally installing it to the wrong hard drive, wiping its entire contents of documents & pictures etc (because there wasn't a backup) in one mouse click.
With the advent of Windows 10, I splashed out on a bigger main hard drive so that I could also benefit from using OneDrive and its cloud based storage. So I was in the process of gradually migrating files from one drive to the other, with my Windows system pointing at two different hard drives on my computer for the files within My Documents, not a great idea really but I was in the process of migrating everything to a central location.
I should have spotted the issues earlier, last week one of the drives disappeared temporarily and then remounted itself under a different drive letter. This week it's corrupted and turned itself into a RAW state. After many, many hours of trying and using various different restoration techniques I've recovered some files but many are damaged, feared lost.
Thankfully the pictures are backed up using Icloud and a NAS drive that I have at home. Some of the My Documents files however weren't so lucky. Probably the most painful casualty is the file containing all the graphics for the blue EMU project - that's gone completely. The only saving grace is that the blue & grey EMU project uses the same basic graphics, and this was stored on the new drive. Although the door handles had been recoloured it would be possible, but time consuming, to produce another blue EMU set. So my three existing EMU sets are now unique!
Always back up your files :(
Sunday, 6 December 2015
Another blue EMU - continued
Having finished work previously on the motor and centre coaches (including the destination blind and headcode) of my spare green remnants of SR EMUs, I was in need of another, non-motorised driving trailer coach.
This one, in need of some cosmetic attention, ticked all the boxes and was snapped up at a reasonable price:


This one, in need of some cosmetic attention, ticked all the boxes and was snapped up at a reasonable price:

The roof had been repainted and there was rust in the sides. Nothing I haven't tackled before!

First job was to rub down and remove all traces of rust, going back to bare metal. This was by far the worst rust patch:

With all traces of rust removed, I primed the body:

Two coats of primer, just to be sure!

The same process of applying the vinyl, cutting the windows using a scalpel, getting small blue rectangles stuck everywhere etc. After several coats of lacquer, we're getting nearer to a gloss finish. As this is matt vinyl, this takes a few layers but hopefully also gives some extra protection:

Cab front was primed and painted yellow. The graphics were printed when the other bodies were produced, so it was just a matter of cutting these off the sheet and applying them over the clear plastic window. It's a rear coach so no headcode required:

After more lacquer, the roof is glued back into position and the body refitted to the chassis:


As stated during the last post, I found that running this unit motorised with the other two SR EMUs presented a few problems. The original set was more than capable of pulling a nine car rake, so I removed the motor assembly from the driving coach (other end) and fitted the body to a standard HD coach chassis.

So this means that I have a spare motorised chassis...
And we can't leave it like that now, can we?
What I need is a project to see me through the next two months until the next show...
This should do the trick:

This little lot has yet to arrive but judging by the pictures, this is one seriously knackered set of EMU bodies. Very rusty sides, more cracks in the roofs than I have ever had to repair before and damaged cab fronts, one melted and one chipped.
As these are all driver & trailer coach ends, I will only need two of the three (for now!) and one of them looks to be in far better condition than the rest (the Ebay listing does verify this) I'll still need a centre coach IF I can successfully restore these.
Then of course there's the other slight issue that I now have 3 x three car EMUs in BR blue. Do I need another three in the same colour or do I try something different? - After all, the class 501 did survive well into the 1980s and the BR blue / grey era. If HD had survived, would we have seen these liveries appear?
So, in anticipation, and these bodies are clearly going to need a fair bit of TLC before I get anywhere near a completed model, I started designing:

The blue is darkened and the grey, with white border is created using the rounded rectangle shapes found in MS Publisher. The carriage numbers have been enlarged, I think they were too small on the previous all-blue versions. The guard and BR signs remain unchanged.
And that led to printing:

Change of vinyl this time, gloss - will be interesting to see how easy this is to work with:

Biggest issue with the gloss I used last time was that the ink smudged, given that it's going to take a while to fix up these bodies, these should be totally dry by the time I'm ready to apply them.
Watch this space...
WMRA open day - last run of 2015
For the tenth and final outing of 2015, we were back at our home club's twice-yearly open day.
We've done several of these now, previously they were used to test modifications and tweaks. Today we tested the completed (yesterday) additional three car EMU and the latest scrapheap restoration - Duchess of Abercorn.
The additional three car unit (I'll post a separate write-up shortly on it) ran well but it quickly became evident that there was no need for this set to be motorised - there is sufficient power in the original EMU to haul its own three car set, the other unpowered three car set and this one as well. So after a quick "running repair" the chassis frame was swapped out in favour of an unpowered one. After several uncoupling incidents, I worked out that the nine car set ran best with the motorised set in the middle, pushing three coaches, hauling its own unit and pulling the other three. In this formation at ran relatively well.


The Duchess, after a sticky start and a minor issue with the tender coupling, ran incredibly well. Considering that this one was destined for the skip barely two months ago, it's come up really well - the grey primer making a great base coat with matt lacquer applied to give a little bit of shine. This was put through it's paces and left to run-in - a nice addition to the layout which I'm really proud of.


As it was only a short day, we didn't fully stock the layout. A few minor track faults were quickly traced and resolved but a major one developed, this time on the shuttle; normally the most reliable part of the layout. For the shuttle to work properly, the entire shuttle track system must be entirely isolated from the rest of the layout, no common return wiring here so the track has a physical break between the shuttle and the rest of the layout (although it's almost impossible to see it)
After much head-scratching and tweaking of track, the only resolution was to split the boards and isolate them individually. This is the second time where a track fault has resulted in separating boards. The 37 pin connectors installed between the boards do work well but are permanently connected once the boards are locked together, making fault diagnosis very difficult. One solution would be to install isolation switches in the common return wiring, which would effectively isolate an entire section but as previously stated, the shuttle is independently wired - if I had employed this method I would still have had to split the boards. The most effective way to resolve is going to be to move the connectors further back and interconnect them using male-female connecting leads. Another project for next year.
3:30pm came around in no time and we were quick to pack down and load up. That's it for 2015, next outing is in February, which sounds like a long time away but in reality is less than two months away!
Having been out ten times in 2015, I already have seven confirmed bookings for 2016. I think we're going to be busy...
We've done several of these now, previously they were used to test modifications and tweaks. Today we tested the completed (yesterday) additional three car EMU and the latest scrapheap restoration - Duchess of Abercorn.
The additional three car unit (I'll post a separate write-up shortly on it) ran well but it quickly became evident that there was no need for this set to be motorised - there is sufficient power in the original EMU to haul its own three car set, the other unpowered three car set and this one as well. So after a quick "running repair" the chassis frame was swapped out in favour of an unpowered one. After several uncoupling incidents, I worked out that the nine car set ran best with the motorised set in the middle, pushing three coaches, hauling its own unit and pulling the other three. In this formation at ran relatively well.


The Duchess, after a sticky start and a minor issue with the tender coupling, ran incredibly well. Considering that this one was destined for the skip barely two months ago, it's come up really well - the grey primer making a great base coat with matt lacquer applied to give a little bit of shine. This was put through it's paces and left to run-in - a nice addition to the layout which I'm really proud of.


After much head-scratching and tweaking of track, the only resolution was to split the boards and isolate them individually. This is the second time where a track fault has resulted in separating boards. The 37 pin connectors installed between the boards do work well but are permanently connected once the boards are locked together, making fault diagnosis very difficult. One solution would be to install isolation switches in the common return wiring, which would effectively isolate an entire section but as previously stated, the shuttle is independently wired - if I had employed this method I would still have had to split the boards. The most effective way to resolve is going to be to move the connectors further back and interconnect them using male-female connecting leads. Another project for next year.
3:30pm came around in no time and we were quick to pack down and load up. That's it for 2015, next outing is in February, which sounds like a long time away but in reality is less than two months away!
Having been out ten times in 2015, I already have seven confirmed bookings for 2016. I think we're going to be busy...
Subscribe to:
Posts (Atom)