Tuesday, 26 January 2016

A tale of two cities - part five

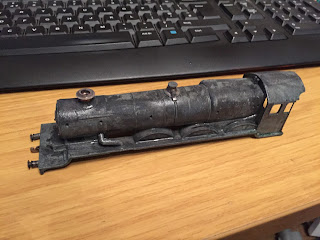
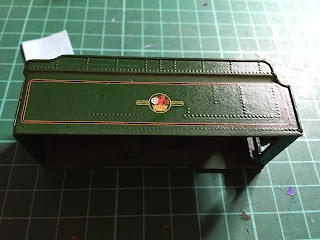
Finished work on the tender:


With the bodywork complete, time to look at the chassis.

I hadn't even tested it to see if it would run, just stripped it, cleaned up the armature (nice shiny commutator below) and light oiling where needed.

As this is a City of London chassis, it's of course two rail. I could refit the two rail pickup assembly and fit it underneath the third rail collector, however I still had the remains of another scrap two rail City of London chassis so decided to remove the wheels and replaced the insulated ones on this chassis to give current return through all wheels.


Having refitted the wheels and third rail collector (using some recently refurbished spoons!) the chassis was reassembled for testing. After a few stutters it was running as expected with current draw around 1/4 amp.

Last few jobs, straighten and clean up the handrails: 


And then, after stripping the smoke deflectors back to bare metal, these were repainted and refitted to the body to complete the restoration.

Time for a test run around the loft, which went as expected.


Sadly however I dropped the loco shortly before taking the glamour shot below, damaging part of the cab side lining, which is highly annoying and can just about be seen in the picture below. For now it can wait, the loco runs on the inner loop so this side faces inwards! I'll get around to repairing it eventually.


So this is the City of Liverpool completed. Still not happy with the yellow lining but it's as good as I can get it with my limited artistic skills.

With work on this City completed, I can now begin planning the restoration of the other City body...

Thursday, 21 January 2016

A tale of two cities - part four

I've now made three attempts to get the lining right, used three different types of paint - this is car touch-up paint, applied using the pin nozzle. It's about as good as it's going to get.

The cab numbers have also been applied.


Now for the tender.

The one that came with this City is plastic and was in very poor condition. It had been repainted before and after stripping, some deep scratches and gouges are visible. This just isn't good enough and the final coat of paint will show every imperfection.

This will need a lot more work if I'm going to produce a second City locomotive:


Luckily I had this tender up in the loft, which became spare recently. Although broken, this makes it easier to paint as I can paint the front section separately and then just glue it back into place.


Back to bare metal again. It took longer to strip the paint off the tender than the loco body did! Clearly it was once a Montrose tender as the original green paint was exposed underneath before finally getting back to bare metal.

After priming and a coat of black, the final red coats were added:


The transfers were then applied and the tender body briefly attached to the chassis to check for alignment, using the middle axle as a guide:


Now to paint in the black sections of the tender chassis, spray with matt lacquer and refit the handrails and smoke deflectors.

Then the chassis will need work...


21st century technology

Having given up with DCC many years ago, I should really know better than to combine modern technology with 1950s state-of-the-art!

BUT - technology has its uses - the shuttle track being a prime example. Trouble is, it's very complicated, what was a simple shuttle control unit has been modified again and again to make it work as it currently does.

For starters, the signal in the main station is just a bit too far away from where the train stops and starts. The programming within the controller turns the signal green for only five seconds and this is not adjustable so SPADs occur. I overcame this by adding a home-made delaying PCB (as used for the automated signals elsewhere).

Then there's the points at the terminus station. It was suggested that it would be great if they could be automated, and I found a way to do it by taking a feed from the shuttle signal - a transistor is wired to the green signal LED, this provides current return for a relay, which operates another pulsing relay (one pulse turns on, one pulse turns off) which then operates the original pcb for the points controller.

Then there's the track isolation, the shuttle has to be completely electrically separate from the rest of the track system, no common return, so to manually operate the tracks (so that I can use the siding) I had to add yet another relay control system to switch out the live and return when the shuttle module is operated. 

All of the above means that there is now a fairly complicated amount of electrical components under the boards just to make two locos run up and down in rotation.

I wasn't looking for a solution as so far, this hasn't really been a problem but after doing some research on how to motorise a standard Dublo turntable (still working on it) I came across several mentions of something called "Arduino".

I've always been intrigued by things like the Raspberry PI and often wondered what they actually do and what people use them for. After learning that they can control devices and require only basic programming skills (years of owning a ZX Spectrum and also using MS Visual Basic!) I decided to splash out a whole £4.00 for this:


After about an hour of reading tutorials online, I'd found a basic program that made the internal LED on its circuit board blink and realised that the basics of the blink program were all I needed to create a shuttle program of my own.

By pairing this with a relay board I can control track polarity, signals and points just by using simple on/off commands and delay times. The first version of the program I managed to figure out in about an hour, just need the relay bank to begin testing. I should now be able to adjust the journey times, waiting times and of course the signal aspect timings. Once the program is sent to the device via PC and USB cable, it's stored within the unit and just needs a 12v supply. It's also possible to control the speed of the loco, so smooth acceleration and deceleration may also be possible in future.

This will mean that the shuttle operation will be via two separate PCBs, one containing the program data and one with all the relays and transistors. It'll make fault-finding much simpler and separate the more delicate programming aspect from the relay controls. In its current format, if a short circuit occurs then the whole shuttle unit shuts down. Sooner or later there is a risk of damaging the unit due to the high current consumption of the locos. Later on I can also look into using variable speed control for starting and stopping the trains more smoothly. 

Clearly there are many more possibilities for integrating these into the layout. The signalling could be operated using one of these and I could then vary the timings and even design it so that the timing doesn't commence until the train has passed the last of the three sensors on the inner loop.

I could even automate the upper loop...

Tuesday, 19 January 2016

Scrapheap challenge - part eleven

The finish is in sight!

The handrail was polished using the bench grinder and before fitting, the body was sprayed with matt lacquer to tone down the shine. Normally the castles have a matt finish.


After checking everything fits properly, the body was removed, motor refitted and then rewired. This one had a brush missing and no wiring inside but it's not a difficult job. 

After a light oiling, and a quick test on the bench, time for a trip around the loft track.


 A little sticky and hesitant to begin with but that was to be expected. After a couple more loops the current had dropped to way below 0.5 amps and it was running sweetly.

Some final poses before I pack away ready for exhibiting:


And that concludes the scrapheap challenge!

I was never intending to buy more locos (apart from the more desirable ones) but when this box of locos and track turned up on the doorstep, I couldn't scrap them and it was very clear that if they weren't of interest to me then they would have been on the way to a landfill the next day.

I'd hoped to get three of the four running but in the end I've managed to fix them all. Two have already made public appearances and the rest will follow. 

The Castle is by far the most challenging of the four due to the amount of linings etc. It also turned out the be the most expensive, however I've worked out that the cost of restoring all four locos combined comes in at around £80.00. An average spend of £20.00 per loco would still generate a profit if I were to sell them, which I won't!

There are still two more complete Castle locos on the desk and another Castle body & tender. The original intention was to remove the names & numbers leaving the paint. Having done this (and quite enjoyed it!) I will probably apply the same level of attention to the other two. This will give me a fleet of five Castles but who cares?

Just need to save up again...

Monday, 18 January 2016

A tale of two cities - part three

I always expected this to be a challenge and that to get this looking half decent would challenge my artistic skills (which aren't that great anyway) to the max.

Although I'm now reasonably experienced with waterslide transfers, the lining for the bottom of the body proved too difficult - it's much thinner than the original version and is applied in sections. As soon as the first section was applied, it began breaking up. I reached the point where I couldn't save the lining and pulled it off.


The cab sides in the kit are also different to the original HD version. I prefer the original look so I modified the design. This gives it a look that's half way between a Dublo and Wrenn version, so it can never be passed off as genuine.


With the cab side in place, I should be adding the numbers but due to the issue with the yellow linings, I'll wait until I'm completely satisfied with the results.


The body, with the yellow boiler band successfully applied and the lining painted in by hand.

At this distance, it doesn't look too bad but close up it's not good, certainly not good enough. 


Shortly after this picture was taken, I scraped it off and tried again using a different paint, again I wasn't happy with it.

I have now sourced a yellow touch-up paint with a pin nozzle, hopefully if I can keep my hands steady enough it'll produce a better result. Sadly my paint brushing technique still needs work.

More to follow...

Sunday, 17 January 2016

Scrapheap challenge - part ten (Castle)


Lots of pictures in this update.

To recap, I acquired a box of Hornby Dublo "bits" that included four very sorry looking locos and set about trying to restore them. Trouble was, I already had far nicer versions of all four of them so I decided to go down the neverwas route.

The next few pictures have appeared in previous updates but to recap, this is the state of the body:


The handrails and nameplates were removed:


The body was then stripped using oven cleaner:


Then primed:


Then painted:


Then the black bits were added:


And I also painted the chassis:


And that is where worked stopped. With the first two locos I was able to do their restoration work for next to no money. The third loco, the Abercorn, required proper brass-etched nameplates and LMS transfers but this wasn't overly expensive to do. For the Castle, this requires lots of transfers, boiler bands, tender linings, logos etc. To do this properly was going to take time and money, hence the lack of work while I saved up!

So with Christmas a dim & distant memory, I went back to Fox Transfers and placed my order.

These are waterslide transfers, which I quite like - they're very forgiving!

When first slid from the backing paper, this is how the tender looked:


But after some tweaking and sliding, I got the tender lining reasonably straight. I currently have two other Castles on the desk (both in need of restoration) and used these as a guide. In the case of one of the old Castles, my linings are a good deal straighter!


With the transfer dried, time to apply the British Railways graphics:


Once dried, the other side was given the same treatment.

Time to fit the bands to the loco body. These have to be cut around the moulding on one side so were done in two sections:


Making progress: 


Now for the graphics for the cab sides. The kit comes with a selection of cab side linings, these are the closest to the old Dublo & Wrenn versions:


Another demonstration of the forgivingness of the transfers, on first appearance this looks a total wreck:


But less than two minutes later, it's perfect:


Now this thing needs a name and number. I have Cardiff and Bristol, I want a Ludlow (and these are expensive!) but thankfully there are many names and numbers available. As a Dorchester lad, I had to have something local!


These are glued to the original nameplates. Nothing too scientific, just turned them around and stuck the brass plates into position:


Now for the cab numbers, again these are brass and are glued into place.

One minor problem is that the glue has a working time of approximately 10 seconds, then that's it.

Thankfully it's straight:


Managed to get the other side done with no issues. The loco is starting to take shape:


As I'd previously resprayed the chassis, I needed to refit the bands to the valve gear:


I purchased some gold paint to resolve the chimney issue and also paint the cab windows and above the wheels:


The next job (once this lot is fully dried) is to spray with matt lacquer, I can then reunite the motor with the chassis, completely rewire it, straighten and clean up the handrails and then once reassembled we're ready for testing.


The next Scrapheap challenge update should be the last!


Thursday, 14 January 2016

A tale of two cities - part two

Time to mask the black paint in preparation for the two coats of red. It took ages to mask this lot using pinstripe masking tape cut into small sections. After about an hour of making sure that everything was suitably masked, the body was ready for more paint...


Back to the paint booth...


The painting is the easy bit.


Two coats of Halfords paint later...


Compared with the other London body, the colour match is reasonable. Only a slight bit of overspray to correct and a small bit of black paint came away with the masking, which has already been touched-in.


These are Wrenn waterslide transfers. Although Fox also make transfers, these are a better fit and are the correct size for the nameplate.


After allowing to dry, this is the result...


Just waiting for the linings to arrive, then the tender needs more work as it's plastic and is in pretty poor condition.