Tuesday, 31 May 2016

Clearing the desk

The last few weeks have been spent trying to make a knackered old Castle look like a Hogwarts Express. This is about as good as it's going to get:


Now to finish the other Castles, which have been cluttering up my desk for ages and feature in the background of many of my other photos.

With Dorchester Castle finished a while ago, I wanted to do a similar restoration job with the remaining bodies. So more transfers were ordered, this time from Modelmaster Decals.

Both Castles were stripped and painted at the same time. The linings were then applied, followed by the brass nameplates, numbers and handrails.

Both have had major mechanical overhauls. With a show coming up at Harman's Cross, it seemed fitting to make a Corfe Castle:


And somewhere between Dorchester Castle & Corfe Castle, you'll find Lulworth Castle:


Including Hogwarts, that's six running Castles. The five green versions are now all together in the stock box, ready for the next outing...


And that will do for Castles, unless of course any freebies turn up out of the blue!

Sunday, 22 May 2016

Project Hogwarts - part three

 The Silhouette Cameo has done a great job with the nameplates and tender graphics, so after lining the loco (with purchased boiler bands) the nameplates, having also been painted red, were applied:


Now for the tender. Again the lining is not home-made but the Hogwarts Railways logo has been made from scratch and cut using the same method as the nameplates:


Starting to take shape, by this point all of the artwork is done:


After two coats of matt lacquer, the body was reunited with the chassis, which by now has also been refurbished, lubricated and painted:


And we're nearly there - just waiting for a set of tender pickups to arrive before final testing, then the headboard needs to be fitted. It's already cut but needs some card to strengthen it.


Then it'll need some coaches. These will either be some existing HD maroon coaches with a Hogwarts logo added (which have already been printed and cut) or some new overlays similar to the blue and blue & grey EMU projects, which will take ages.

Whatever happens, it'll still be a while before a complete Hogwarts Express takes to the layout.

Clan Line

Here we have a Wrenn two rail loco that was acquired for a very good price and in it's original box.

The condition was so good that I almost considered selling it on, having seen how much these were fetching in this condition on Ebay.

However I realised that I could modify this for three rail running in such a way that the process could be easily reversed and without damaging the chassis. So first job was to dismantle it:


The phosphor bronze strips on the left of the picture above are what I used to return current via the insulated wheels. One strip cut to length is twisted to shape and then, having scraped some paint away from the chassis under the plastic two rail collector, these are clamped to the body using half of the old two rail collector:


The new strips are just visible (bottom wheels)

Next to strip the motor and check the armature.

The brushes are barely worn but the commutator looked quite dull:


...So it was given the drill & fibreglass pen treatment:


The motor was then lubricated and reassembled, with the magnet being turned 180 degrees.

Now for the third rail pickup. The Westcountry chassis requires a longer screw for the third rail pickup and these aren't easy to come by. So the modification below was fabricated for me using a brass collar that was drilled and tapped to the right thread, and a piece of threaded bar cut to the appropriate length:


Some cleaned up spoons were added:


And the modified pickup was bolted to the chassis:


After reassembly, we're ready for testing around the loft: 


Sunday, 15 May 2016

Project Hogwarts - part two


Work continues, using leftover paint. No white primer left so grey it will be...


With the previous maroon LMS repaints, I painted them black and then painted the red over the top to darken the effect. this has gone straight over the grey primer, which makes it slightly lighter but still not as red as the Hornby-produced version...


After masking, the black cab roof, front and sides are painted black, ready for lining and transfers... 


I'm not aware of anyone selling the graphics commercially, so this lot had to be constructed from scratch using Paint & Publisher...
My skills with a scalpel are not great. I am now however the proud owner of a silhouette cutting machine which, once programmed correctly, can plot and cut my transfers with remarkable precision - this little lot were done as a trial set as the machine only arrived on Friday. By the early evening I had my first, usable results..,


Couldn't help but test them. I'll need to fit the cab linings first but they're still on order. There's sufficient spare numbers that I can peel this one off later but the effect is impressive, so is the nameplate. The holder itself is still green so will need to be painted before the final graphics are fitted. These fit really well into the GWR nameplates.


Still a long way to go...

Tuesday, 10 May 2016

Project Hogwarts - part one

I'm not a massive Harry Potter fan but I have sat through most of the films!

Prompted by the recent appearance on Ebay of a Bristol Castle that had been rather crudely painted red, I was mindful of the Hogwarts Castle locomotive.

A bit more research shows that the actual locomotive used is a Hall class (even though it's called Hogwarts CASTLE) but the model version produced by Hornby is a Castle locomotive.

I could cheat and put a modern, plastic body onto a three rail chassis, but that would be too easy!

What I need is a long-term project...

I have red paint left over from the City of Liverpool, it just needs to be a shade lighter - using a white primer should overcome this.

I also need a scrap body - this was a Bristol Castle and has just spent the night in a tray of Cillit Bang (quite effective)


Now for transfers - these don't seem to be commercially available so I'll have to be creative and make my own, including the tender crest.

For now I've managed to create the nameplate banner and cabside numbers using my PC:


...and did a quick test print to check the dimensions:


So far so good, but a long way to go yet...


Thursday, 5 May 2016

Aftermath

So after a four day hammering of the rolling stock, time to commence servicing and repairs.

The video of our time at Abbey Hill can now be found on the YouTube page.

What the video doesn't show is just how much of a hammering the 0-6-2 tanks got, particularly over the first two days.

I decided to take a look at all of the tank locos, starting with the failures and then checking the rest. My black LMS tank expired with a puff of smoke from the cab, which I presumed meant that the armature was no more. As it turns out, the damage is no more than carbon build up between the commutator segments.

Not easy to see, but the commutator gap is almost non-existent and full of carbon deposit:


After a quick clean up using a knife blade and fibre glass pen, the armature was refitted back into the loco and after a quick lube, it's running fine - result!

Next for the red LMS (2273) that I rewound myself. Again the issue appears to be carbon build up, the resistance readings across all three segments are fine and no issues with the way I've wound the armature. After another clean up and lube, this also runs fine.

So basically, nine of my ten tank engines have been stripped and cleaned, the only exception being the GWR tank, which is a recent acquisition and not in need of overhauling (yet)

Next job will be to check the 2-6-4 tanks, then I'll slowly work through the rest of the stock box by box.

Plenty of time before the next outing.

Monday, 2 May 2016

Somewhere, in a field in Somerset...

Four days of playing trains, roughly about 30 hours of running.

That's quite an achievement in itself but then factor in that we were in a marquee for the first time!

So we found ourselves in the craft & modelling tent at the Abbey Hill Steam Fair, surrounded by all things steam driven (fantastic smell) pitched our caravans (first time we've camped and played trains too) and set about getting this thing to work in a tent. 

The solution to the uneven ground was to use various metal and wooden shims...


Thankfully these were all expertly machined for me prior to the event and there were plenty of them, so after some considerable tweaking, including using a spirit level for the first time since the layout was built, we actually ended up with a perfectly level layout that was reliable enough to even brave the goods train on the upper loop!


I was cautious about running the older locos on the shuttle, as four days of short runs along the shuttle probably wasn't going to be a good idea. So the recently acquired Lima railcar was deployed, having added extra ballast...


The Bachmann DMU also made its first appearance. It was only brought along to see if it would run but actually ended up spending most of the four days running up and down in tandem with either the GWR railcar or the Hornby bubble car!


As for failures - there were a few, and this was to be expected. Having celebrated running for two days with only two failures, two more locos failed in short succession shortly before the end of the second day!

The blue and grey EMU failed twice, each time a broken wire was the culprit and the wiring is now so short that a complete rewire will be required. I did at least manage to get it going again.


One of the two red LMS tanks also failed, sadly the one that I restored as part of the scrapheap project. The top bearing nut came loose and the armature lifted to the point that the carbon brushes were running on the bottom edge of the commutator, knocking off one of the coil connections. Hopefully it'll just need re-soldering, if not then the armature will have to be rewound again.


My faithful black LMS tank also failed with a nice puff of expensive smoke shooting out of the driver's cab, another armature job I suspect.

The Pacer also got an outing, spending most of the time running on the upper loop without issue before it also shuddered to a halt. Hopefully just a light oiling required.


The Bachmann DMU, Hornby bubble car and Lima railcar were used throughout the weekend on the shuttle, with the SR EMU substituting the Bachmann DMU on the final afternoon. All ran really well and without incident. This combined with the Arduino shuttle control system provided a lot of interest - we were the only model railway in the exhibition so attracted people who weren't expecting to see a toy trainset!


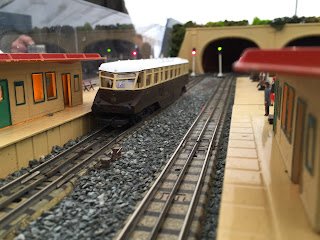
 The GWR railcar in the smaller shuttle platform at Brough. The extra ballast meant that the reverse curve and points were not an issue.


After four, hectic and full-on days of keeping all four tracks in use, I've returned home with only a handful of locomotives requiring attention. Some will need only minor servicing and possibly two will need armatures. Considering the age of the rolling stock, the extremes of temperature and moisture levels of the marquee and the uneven ground, I think we've done pretty well to come home with so few casualties after such a battering. 

Sadly the final day was cut short due to the poor weather but we'll be back again next year. Our next outing in July is also in a marquee (not four days though!)

Plenty of video footage has been captured, including the Pacer running at a stupidly fast speed, this will be uploaded in the next few days.